Electric Cooling fan installation
by Shifty
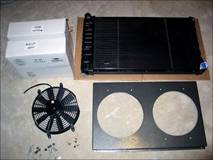
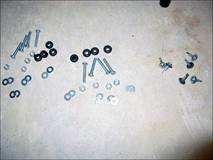
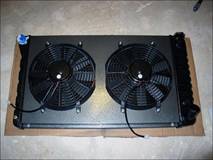
Here are the parts used, as pictured in the attachement:
* (2) Flex-A-Lite 12" fans - I purchased from Classic Heartbeat,
Wes has them readily in stock. This unit is not sold in stores - it's part of their "pro air electric fan" line and
it is NOT listed at their website. This is a heavy duty version of the Flex-A-Lite part number "112", it flows more air, costs
about 8 bucks more. I believe the 2-core radiator would only use 1 fan. This is
Flex-A-Lite part number "212".
* (6) self-tapping 8-18 x ¾ screws
* (6) neoprene 3/8-OD washers (optional)
* (8) bolts - 1" length will work fine, I got 1¼" and they're a tad
long
* (8) polylock/nylock/stop nuts (whatever you call
them) to fit those bolts
* (16) washers to fit those bolts
* (8) ¼" grommets.
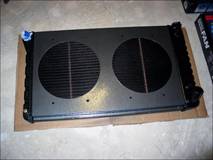
* (1) Fan shroud - this is a custom fabbed piece that
is made exclusively by Wes at ClassicHearbeat.com, and it comes in a 2-12" fan setup
or a 1-12" fan setup. I assume the 2-core radiator will use the 1-12"
fan setup. I got mine powdercoated in "Silver
vein" from GMCPauls for $129. This is an incredibly nice
piece, superior quality!
Costs (not including shipping):
Fan shroud: $129
Fans: $152
Hardware: $10
NOTES:
You can add another $20-40 to that total depending on how you wire it. Wiring
instructions are inside the box. Flex-A-Lite sells a
temperature sensor setup for these fans on the cheap...might be worth looking
into if you won't have a computer to control yours like I do.
I went with this list because it is literally a direct bolt-up, no real
drilling required. You could opt to cheap out on it and hit the junkyard and
find some fans, but .... you're
going to end up needing to hack or drill the shroud and that just wasn't an
option for me. I initially purchased some Mr. Gasket 12" fans and they DID
NOT fit the hole provisions given in this shroud (they
cost the same as the F-A-L fans from Classic Heartbeat).
The fan shroud Classic Heartbeat makes is a direct boltup
for a stock radiator. Wes makes it to specifically fit the Flex-A-Lite fans he sells, so no drilling of the shroud is
required, just bolt the fans to the shroud, clamp the shroud in place on the
radiator, drill pilot holes into the top and bottom rail of the radiator, then
use the self tappers with the washers to finish the
job and you're done. You can buy this unit pre-fitted with fans and pre-wired
from Wes for about $50-150 more, depending on which shroud you go with.
Finally, since someone is bound to ask...."How do you know if you have a
2-core or a 3-core radiator?" - Well, the 3-core is wider, and uses the
widest mount configuration possible on the radiator core support. The 3-core
fits about 1-2 inches away from the battery tray, whereas the 2-core will be
5-6 inches away from the battery tray
.
To start, remove and drain your radiator.
Next, decide if you're going to mount your fans on the front of the radiator
(between grill and radiator, pushing air), or on the back of the radiator
(between engine and radiator, pulling air). These Flex-A-Lite
fans support both setups. Most fans are mounted and wired out-of-the-box to
pull air if you put (+) power to the red wire and (-) ground to the black wire.
Be sure to read the instructions for the fan you choose to figure out whether
you just need to flip the fan blade *or* reverse the polarity of the wiring to
convert the fan from a puller into a pusher in case you require this for your
setup.
Test fit the shroud over the radiator. I lined mine up on the top and bottom
rail of the radiator, then used the 'quick clamps' I
have for woodworking to clamp it at the top and bottom.
Then I drilled some pilot holes for the self-tapping screws (makes life
easier), and did an initial seating of the shroud using the screws and washers.
You can see in the pictures below how the shroud fits over the core itself and
butts up against the rail on top and bottom of the radiator.
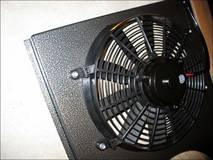
Once you've test-fitted your shroud, pull it off again to mount the fans.

The fans come with flush-mount tabs as shown in the pictures
below - they slide right into the fan.
As recommended by Wes, I bought the rubber grommets above to cut down on
vibration. ¼" grommets are a perfect fit and pop right in. Anything larger
than 5/16" was too big.
Insert grommets in the 8 fan mount provisions (pictured below).
Insert the 4 flush-mount fan tabs into each fan you're using.
Be sure to think about where you will be routing your wires BEFORE you mount
the fans. Will you go along the bottom of the core support, or will you try to
tie into the existing wire run across the top of the core support? Think about
this before you bolt up the fans ![]()
Place the fan on the shroud and line it up. From the bottom up, I mounted
things up like this:
nut
washer
fan flush-mount clip
shroud/grommet
washer
bolt head
I chose to use washers so the bolt wouldn't pull through the grommet on the
bottom or the clip on the top. I chose the stop nuts because they tend to not
come loose with vibration, and I didn't feel like using lockwashers.
I chose to fit the bolt with the head closest to the radiator to leave the
least possible amount of bolt protruding into the radiator. Obviously, you can
do this any way you want.
Either way, complete bolting the fans to the shroud
and proceed.
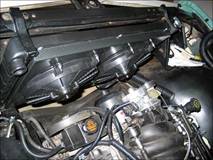
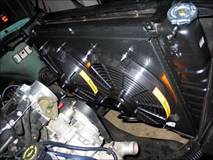
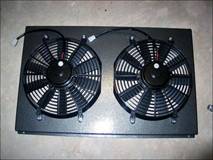
Pictures of my completed setup are attached.

Next, mount the fan/shroud assembly back onto the radiator.
Reinstall the radiator in your truck.
Now is the time to decide what to use for an electrical/wiring setup. Here are
some tips on wiring so you don't screw your stuff up:
* Regardless of what you do, wire things SAFELY -- Use a 20A inline fuse (or
breaker) for each fan
* Just like you would rewiring your headlights, use a relay to deliver the
power if you're putting a switch inside the vehicle (you can also use relays
with the temperature sensor setup sold by F-A-L, Mr. Gasket and other
companies).
* When supplying power for the relay, be sure to use an IGN (hot when
"on") lead. If you give direct battery power, the fans can cut on
when the truck is off and drain your battery.
Once you're wired up and ready to go, fit your radiator hoses back on, fill up
with coolant and turn on the vehicle to test your setup.
Some pictures of my complete (but unwired) setup are
attached.
If you went with a black shroud rather than the silver vein like I did, it
would be very hard to tell that this was not a stock setup - the pictures do
not do this fan shroud justice - it is really, really nice!
The only thing I thought could have been added is an additional 2-hole
provision to mount your relays directly to the shroud, and maybe plastic caps
so people can plug those holes if they aren't required.
For some bigger version of the install pictures, I'll leave these links here: